JPOS eInvoice
- electronically import your invoices from your major wholesalers
- updates your quantities on-hand
- updates item costs and retails
- automatically adds new items
- updates item descriptions
- updates vendor item SKUs
View Demo Using FTP Download:Download
eInvoice
View Demo Using Emailed Invoice:Emailed
eInvoice
|

|
JPOS eInvoice Program - Instructions
|
|
The eInvoice program is designed to help you with inventory control. It is used
to process invoices. This processing will take the data from the electronic invoice
(downloaded directly from your vendor's FTP site or received through email)
and input it into the JPOS files.
The first time you run the eInvoice program, you will be prompted to select the vendor
from whom you will be downloading invoices. Next you will be prompted to locate
the JPOS BackUp program (usually C:\Program Files\JPOS BackUp\JPOS BackUp.exe).
|
If you receive the invoice files by email:
- use your email program to get your email with the invoice attachment
- save the attachment to wherever you like.
(the Desktop is easiest - in a later step,
you will need to be able to locate the file in order to process it)
- in the JPOS eInvoice program dialog box, locate and select the file you saved from
your email
|
|
If you download the invoice files directly from your vendor's FTP site: (the
Vendor FTP Settings must first be in place before
you can download an invoice from the vendor's FTP site)
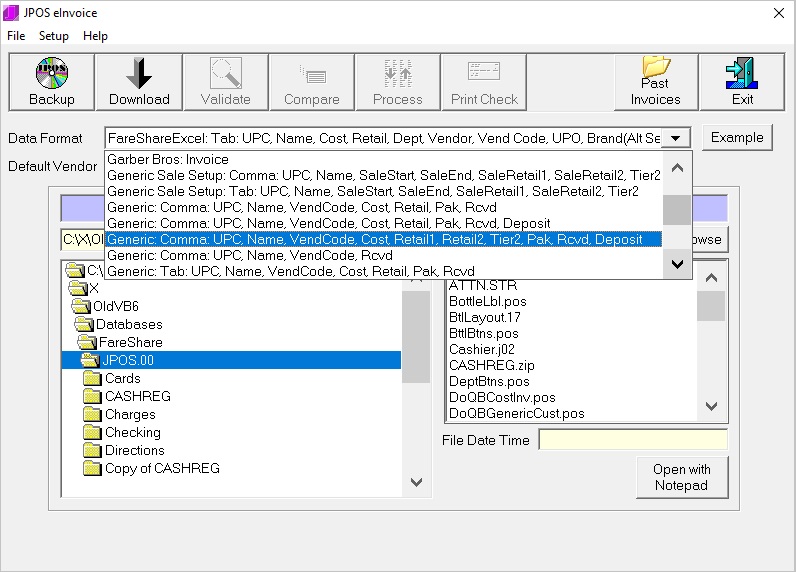
- click the Download File button
- select the vendor
- click OK
a dialog box will appear showing the progress of the download
then a confirmation box will appear to let you know that the file was downloaded
in the left window pane, the FTP RECEIVED folder containing the downloaded file
will be automatically selected
in the right window pane, the actual file downloaded should be selected
|
|
Once the file is selected, the Validate File button will become "enabled"
click the Validate File button.
If the data is not valid, you will get a message stating that the data is invalid.
You may also get a popup message that states "Header Info has changed. The
file format may have changed. This software may need to be updated to use the new
format. Call JPOS for support." - this is to guard against the likelyhood that
the file format will be changed by your vendor. When and if they do change the data
format, a software upgrade/fix from JPOS Software will be necessary in order to
continue processing files from this vendor. You may also get the above error message
if you fail to select the correct file that you downloaded from your vendor.
if the data is valid, a confirmation dialog box will appear.
click OK Notepad will open up and display the data from the file. You should review
the displayed data before you proceed.
close the Notepad window.
once the file has been validated, the Process File button will become enabled.
click the Process File button...
|
|
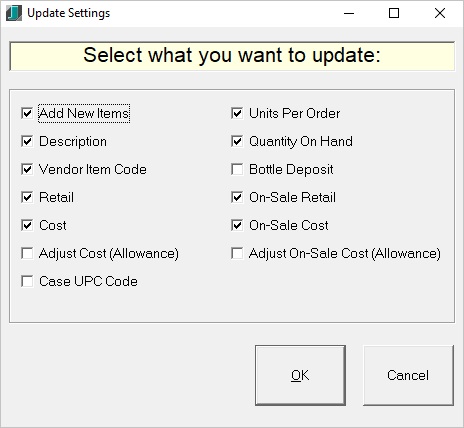
the Update Settings dialog box will appear.
check or uncheck the checkboxes according to how you want to update the JPOS database.
click OK.
the data will be integrated into the JPOS database.
|

|
|
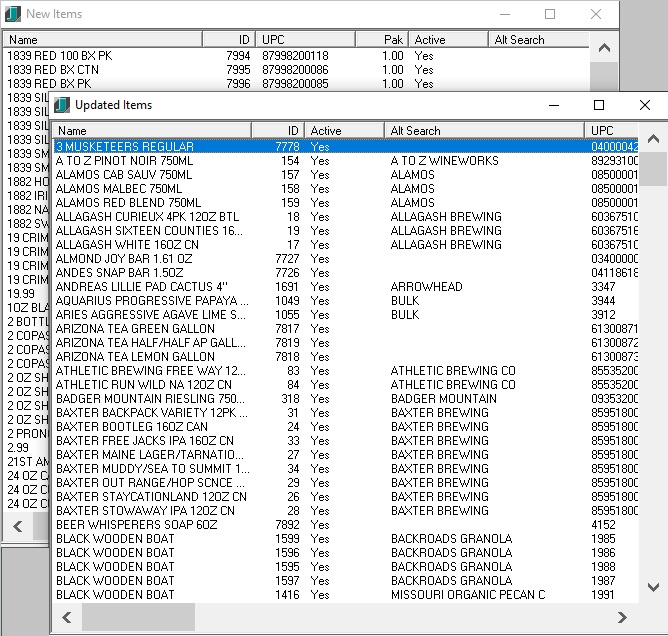
A list containing new items, changed items, and items that have had a cost change.
You may double-click on any of the items in these lists to edit them.
|

|
|
New items are automatically added to the Quick-Add department. You should put these
items into the correct department. Also enter any bottle deposit and the correct
tax status as well.
|
|
Vendor FTP Settings
|
|
If you only receive invoices via email and don't plan to use FTP direct upload/download,
you can skip this section.
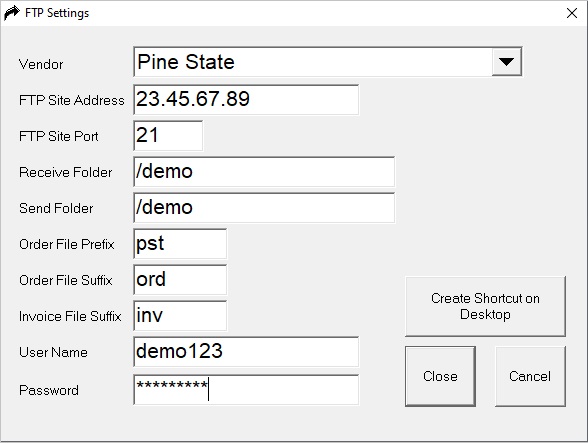
Before you can download or upload order files to an FTP site, you must fill out
the FTP settings for the vendor.
click Setup
click Vendor FTP Settings
|
|
select the vendor
your vendor will supply you with the FTP address
the port is usually 21
your vendor will supply you with the FTP folder
order file prefix is usually blank
the default order file suffix is: ORD or LIQ
the default invoice file suffix is: INV
your vendor will supply you with the user name
your vendor will supply you with the password
click Close to save and close the dialog box
|

|