JPOS Checking
|
File
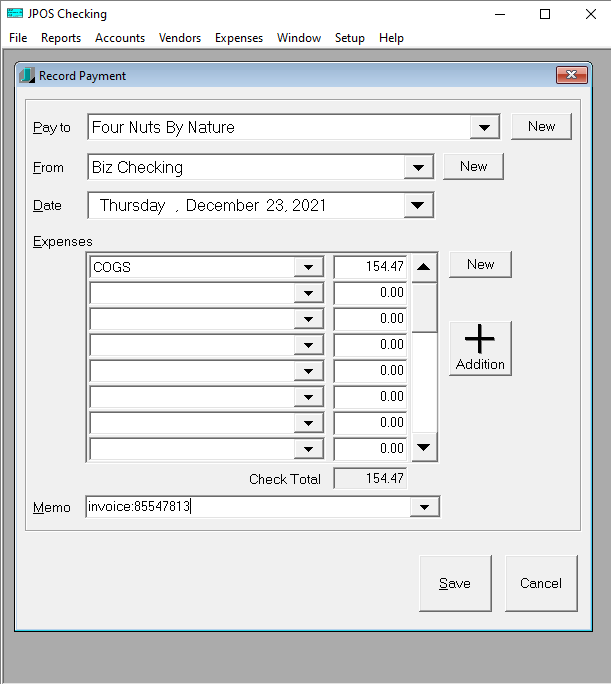
- Record Payment- To record a payment for one of your vendors select the "Record
Payment" option under the file menu. A screen will appear asking you to choose
who the check is going to. You will then be asked to pick which account the payment
will be coming from and when the check is to be dated. If the person/vendor you
are making the check out to is not on your list you can add a new person/vendor
by clicking the "new" button that is to the right of the "pay to"
box. You can do the same with the account the money is coming from if the account
is not already listed. You can then choose which expense accounts you want to apply
the check to and how much of the check you want to apply to the account, the amounts
that you put in the expenses column will total in the "check total" box
at the bottom of the expenses column. When you have the desired amount in the "check
total" box you can move on to the memo box where you can type in any information
you would like to appear on the check i.e. and invoice number. When you have finished
select the "save" button.
- Record Deposit- To record a deposit after you have made one at the bank select
the "Record Deposit" option under the file menu. A new screen will appear
where you will have to choose which account you deposited the money to, the date
of the deposit, the amount, and any memo you would like to insert. After doing this
select the "save" button.
|
- Void Payment- To void a payment select the "Void Payment" option
under the file menu. On the new screen that appears select a start date and an end
date between which the payment you want to delete is located, you can then either
select the search to have a wide outcome or you can narrow your search down by choosing
a payment account, vendor, and/or expense account. After hitting the search button
a list of transactions will appear. Find the transaction that you would like to
void and select the done button.
- Void Deposit- To void a deposit select the "Void Deposit" button
under the file menu. On the new screen that appears select a start date and an end
date between which the deposit you want to delete is located, you can then either
select the search to have a wide outcome or you can narrow your search down by choosing
a deposit account, vendor, and/or expense account. After hitting the search button
a list of transactions will appear. Find the transaction that you would like to
void and select the done button.
Report
- General Expense Report- This report will give you the total dollar amounts
applied to your expense accounts for a certain day or period of time. To view this
report select the "General Expense Report" from the report drop down menu.
On the new screen select a start date and an end date then press the search button.
If you would like a more narrow search you can select a specific payment account
or vendor before you select the search button. After selecting the search button
your report will appear on the screen.
- General Vendor Report- This report will give you the total dollar amounts
paid to all of your vendors for a certain day or period of time. To view this report
select the "General Vendor Report" from the report drop down menu. On
the new screen select a start date and an end date then press the search button.
If you would like a more narrow search you can select a specific payment account
or expense account before you press the search button. After selecting the search
button your report will appear on the screen.
- Payment Finder- This will help you find a specific payment. To do this select
"Payment Finder" under the report drop down menu. On the screen that appears
select a start date and an end date between which the payment might be and press
search. If you want to narrow the search you can choose a payment account, vendor,
or expense account before you press the search button. Once you press the search
button your report will appear.
- Deposit Finder- This will help you find a specific deposit. To do this select
"Deposit Finder" under the report drop down menu. On the screen that appears
select a start date and an and date between which the payment might be and press
search. If you want to narrow the search you can choose a deposit account, vendor,
or expense account before you press the search button. Once you press the search
button your report will appear.
Accounts
- Current Balances- To view the current balances of your bank/payment accounts
select "Current Balances" from the Accounts drop down menu. A list of
your bank/payment accounts and their balances will appear.
- New Account- To make a new bank/payment account select "New Account"
under the Accounts drop down menu. On the new screen type in the account name and
press "ok".
- Show Accounts- To view a list of your bank/payment accounts select "Show
Accounts" from the Accounts drop down menu. A list of your bank/payment accounts
will show along with whether they are active or not.
- Reconcile Accounts- To reconcile your accounts select "Reconcile Accounts"
under the account drop down menu and make sure you have your bank statement from
your own bank in front of you. On the new screen you first choose the bank account
that you would like to reconcile, and then choose whether you are going to be reconciling
the debits or credits and then press the "Search" button. You will then
want to put in how many debit or credit transactions are on your bank statement
and what their total amount is. To reconcile start matching the transactions on
your statement to the transactions in the list on your computer. When you find a
transaction on your computer that matches to one on your bank statement click the
box to the left of the specific transaction. After doing this you will notice that
the transaction you just selected has cause the "Your Totals" section
at the top of the screen to increase by one under the "Counts" column
and to increase by the amount of the transaction under the "Amounts" column.
Continue to do this until there are no totals under the "Difference" section
at the top of your screen, when the "Difference" section is zeroed out
you have successfully reconciled your account. If you are in the middle of reconciling
your account and you need to leave the BackOffice program you can save your progress
and continue later by selecting the "Save" button.
Vendors
- New Vendor- To add a new vendor select "New Vendor" from the vendor
drop down menu. On the new screen you will be asked to enter the vendor's name,
address, city, state, zip, phone number, account number, and email address. If you
need to add any additional comments select the "Notes" tab at the top
of your screen. On this screen you can type in any comments you my need to.
- Show Vendors- If you need to see a list of your vendors and their information
just select "Show Vendors" under the vendor drop down menu. The list of
vendors and their information will then appear. You can edit the vendor from this
list by double clicking the vendor you want to edit, this will bring you to the
"Vendor Properties" screen where you can edit the vendor's information.
Expenses
- New Expense Category- To create a new expense account select "New Expense
Category" from the Expenses drop down menu. On the screen that appears type
in the name that you want your expense account to be. You can also put in a memo
in the designated area. When you are done filling out the information press "ok"
to add it to your list of expense accounts.
- Show Expense Categories- If you want to see a list of your expense accounts
select "Show Expense Categories" under the expenses drop down menu. A
list of your expense accounts with any memos will be listed on the new screen.