JPOS BackUp
|
Back up your JPOS data to many storage devices including, CD, DVD, flash drive,
external hard drive, etc.
Instructions for backing up files to a USB Flash Drive:
Nearly all JPOS data is stored in the JPOS.00 folder, some details are stored in
the Windows Registry for each station. It is not useful to back up the JPOS info
in the Registry since it is easily re-created in the case of a computer crash.
- The first time you run the JPOS Back Up program you will need to specify the source
and the target. The source is the parent folder of (folder containing) JPOS.00.
- At the main register (typically the server and named Station1), the typical location
of the parent folder of JPOS.00 is D:\JPOS\. If the server computer only has a C:
drive then you will most likely find the location is C:\JPOS\.
- At any other station on the network (client computers typically named Station2,
Station3 ...), the usual location of the shared folder containing JPOS.00 is \\station1\JPOS\.
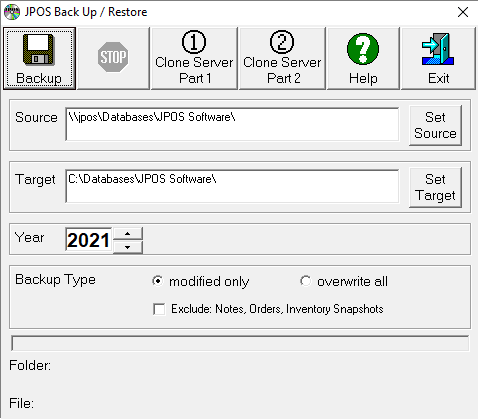
- To set the source either type the path directly into the Source field as shown in
the picture above or use the Set Source button to browse for the parent folder of
JPOS.00.
|
|
- The target is where you will store the back up files. Type the drive letter of your
flash drive. In the picture above, the flash drive is drive G so the entry in the
Target field is G:\. You may optionally create a folder on your flash drive and
back up into that folder. The back up program will only create a single folder (JPOS.00)
on your target, so you don't have to worry about hundreds of files appearing
all over your flash drive. Once the Source and Target have been set, they will be
remembered for subsequent uses of JPOS Back Up.
- The Year field can be changed to back up any other year. By default the current
year is always selected.
- The options in the Action field are "backup modified files only" &
"overwrite all files". The only time you need to select the "overwrite
all files" option is when you believe that the previous backup was corrupt,
otherwise use the "backup modified files only" option
- Once you have set the Source, Target and Year, click the Backup button. The backup
process will begin. A progress bar will appear showing the overall progress and
the names of the files being backed up will also appear.
- Upon backup completion, a dialog box will appear with a message specifying the number
of files checked and the number of files backed up.
To use a CD or DVD as the target, you need to use 3rd party software (generally comes
bundled with your computer's CD or DVD drive) to format the CD or DVD for direct
file access.